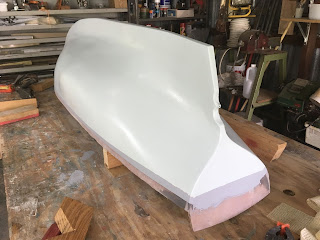
There is a photo of the mould for the lead keel in the previous post. I was nervous about melting the lead and pouring it into the mould for a variety of reasons. After a week of sitting in hot sunshine the surface of the mould still felt damp; I decided that the Plaster of Paris is hygroscopic and the high humidity made the surface feel damp. I was also concerned about actually spilling the molten lead and being splashed. Consequently I approached the job wearing heavy clothing, boots, welding gloves and a full face mask. This on a day when the temperature was 37C! The melting was easy, gas stove and old stainless steel saucepan in the open air. The pouring was harder because the saucepan was heavy (obviously), didn't have very good handles (although a pair of multi-grips improved on this) and didn't have a pouring spout. The lack of a spout was the biggest problem and resulted in a somewhat messy pour.
I cut of the flashing around the top with the bandsaw and then flattened the top with the power planer; both dealt with the lead OK although there was a tendency for the lead to "weld" onto the edge of the planer blades.
I made the pattern sightly larger to allow for the shrinkage of the lead as it cooled with the result that the casting was slightly oversize. The excess was removed with the power plane and belt-sander. In the photo above the lead is sitting on the hull as I "fine tuned" the shape. The pitting in the surface is due (I think) to the surface moisture in the mould which became steam and bubbled through the molten lead. Thankfully it didn't cause any splashing.
I drilled holes for fixing screws (bronze) and bedded the casting in place using thickened epoxy. Some more bag and sanding and the hull was ready for the the fibre glass cloth.
Two coats of unthickened epoxy with each coat applied when the previous coat was just still tacky and it looked like the next photo. A third coat with enough sanding filler to give it a creamy consistency completely filed the weave of the cloth and provided a surface that could be sanded flat. The coats of resin were poured on and spread with a squeegee cut from a length on 1.5mm balsa sheet.
The patchwork quilt disappeared under three coats of primer and 3 coats of undercoat followed by a lot of wet and dry sanding.
Then the waterline was marked and taped and 4 coats of satin finish paint sprayed on.
Now to the exciting part. I "launched" the boat into my garden pond to see where she floated and to get a feel for how much internal ballast would be needed to sink her to her waterline. The photo at the start of this post shows Tally Ho floating quite high with no internal ballast added. Adding a mixture of lumps of lead and concrete pavers sank her down to her waterline.
Now for some numbers. The bare hull weighs about 12 kg and the internal ballast added 17 kg for a total of 29 kg. It's now clear that I will need a trolley of some sort to transport the completed model to the water. Sure I can carry 29 kg but not when it is a big awkward shaped model boat!
It is interesting to compare my model displacement with the full size displacement given on the original plans, The plans show a displacement of 30 (English) tons or 30481 kg. At 1/10 scale the volume of water being displaced is 1/1000 of the full size boat so my model displacement should be about 30.5 kg. Adding another 1.5 kg of ballast to the model would sink it a bit more but only by a couple of millimeters.
I think it has all worked out according to plan.


